Featured post

Hello and Welcome to my Blog!

A-k-a, my public learning diary for my 3D animation degree and since graduating, my free-time independent 3D studies and personal projects ...

Showing posts with label Cat. Show all posts

Sunday, 10 January 2021

ZBrush & Maya Vector Displacement Maps

This post is an additional test/learning lesson from my ZBrush cat series I started last year in which I introduced myself to basic XGEN and Maya's retopology tools, I also experimented with sculpting stylised fur and general displacement maps. 

The original intention when starting out was I wanted to create a vector displacement map that projected the long fur model onto the no-fur cat sculpt that was retopologised. I struggled with this for a while and was something that was picked and dropped a few times. But finally, FINALLY, I've figured it out.


When working with a render engine, the less poly count it has to calculate the faster it will render. Retopologising the no-fur cat sculpt lowers that poly count drastically and is what should be done if this were an asset for a scene, (alongside UV mapping of course). But for this learning experiment I haven't because a) the same logic/technique applied should work on something that's retopologised too and b) in my screenshots above, that retopology is probably still too high a poly count than what it needs to be. I have since then discovered ZBrush's zremesher that creates a good starting point for retopology.

Ignoring the no-fur cat from this point on. Looking at vector map generation you need a low sub division level and a high one, this is so the vector map can calculate how to displace the low resolution mesh to look like the high resolution mesh without the hours of render time. 

Throughout sculpting, clever me, repeatedly deleted all lower sub division levels, "Nice one, Paris!". 

Problem 1: How do I get those lower subdivision levels back?

You duplicate your high resolution mesh and you use the ZRemesher to drastically lower your poly count, making the left image look like the right.


You then build up those sub division levels, keep dividing until the low poly mesh has round about the same poly count as the high resolution mesh. Then you project the details from the high poly mesh onto the low poly's highest sub division level.

The short video below demonstrates this in more detail:


After that I exported my model on its lowest subdivision and imported it into Maya, (for this practice I auto unwrapped my UVs in ZBrush).


Now this is where the real struggle kicked in. 

Problem 2: Getting the right Vector Displacement Map (VDM) to work.

Turns out VDMs need to be mostly green. The first dozen attempts I kept getting results similar to this... (I even jumped ship at one point and tried using height and normals maps... Nope - don't do that.)
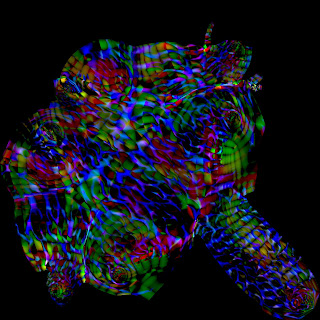
 

In the end, this was the winning map and result was...


So how do you make and export the map correctly from ZBrush and use it with Maya? Check out the screenshots below the video or watch the video I used.


Just in case for some reason this video gets taken down, I've screenshotted the settings below.

Zbrush:

ZBrush kinda has its map settings all over the place, in the ZPlugin there are 2 sub categories for Vector Displacement under the Multi Map Exporter, one is "Vector Displacement" the other is couple options below that and is labelled "Vector Disp Map". There are also settings hidden under the "File names" button which may need changing (right image).


Another area to find more settings is on the right side, scroll down to the bottom where it says "Vector Displacement Map" and also change some settings under "Export" tab.


When you're finished with the settings, go back to the Multi Map Exporter in ZPlugin and press Create All Maps.

Maya:

Hypershader settings:


Object attribute settings:


Saturday, 20 June 2020

ZBrush Cat - XGEN Fur

For the past week or so I've been exploring one of Maya's rings of hell - XGEN, which is notorious for being very buggy. I haven't managed to create anything amazing or got it to render too well but I have managed to teach myself the basics and apply that to my cat. (Left render is with aiStandardHair shader and the right is XGEN's default hair shader.)


There are two XGEN methods for creating hair. There's 'XGEN interactive' grooming which I've used for this as it is more artist friendly and allows me to work across separate layers and in chunks. And then there's the core XGEN which might be more ideal for sculpting human hair.


Below are some close ups of the groom in the viewport. You can create descriptions for UV shells in the UV Map editor so I created the body, tail, inner and outer ears separately although looking back maybe I should have kept the tail with the body.


I wondered, if I put a collar on the cat how would I get the fur to react to it? See how the fur parts on my cat as a result of her collar.

The answer? Collision modifier and increasing the collision distance value in the attribute editor.

Another way of creating hair partings are by either painting with the part brush or creating region maps.
Screenshot from Autodesk Website: HERE


BUGS!

I've found a few bugs, the most annoying one being that some hairs refuse to be combed nicely - this is most noticeable on the cat's tail where it looks quite ugly and there's a small patch symmetrically on the side of the front legs like it. Also when attempting to comb the inner ears, despite having 'Collide with mesh' ticked and testing different collision distance values, the hairs with one click (regardless of brush strength and size) immediately went inside the ear mesh. I haven't been able to figure out why any of this happens yet.

When I was creating a mask map for the clump modifier and turned the visibility off in the outliner for the body's XGEN description, I found random patches did not disappear, (the ears are supposed to be visible in the below screenshot). 

TUTORIALS!

For XGEN interactive, I found the below tutorial most helpful out of the total of 6 I watched for both XGEN methods.


For XGEN (not interactive) Flipped Normals have a great tutorial recently posted on Youtube.


Danny Mac also has a great short intro to XGEN (not interactive) for anyone who finds 40 minute long tutorials a bit daunting to begin with.

Tuesday, 9 June 2020

ZBrush Cat - Displacement Fur

For this round of experimenting, I've attempted to sculpt fur using a stencil in ZBrush and create a displacement map to plug into Maya for rendering. 

First of all, I retopologised the cat in Maya, (which can also be done in ZBrush), and UV mapped it. (This is not intended for animation purposes hence it is not in a rig-able pose). 

It has to be UV mapped before sculpting the displacement. You can't sculpt too drasticly away from the original mesh either (like I did with the stylised fur in the previous post) because it distorts the UVs creating an undesired effect. 

The cat was not retopo'ed or UV mapped when I sculpted the stylised fur as I had not planned on using it for displacement map testing at the time.

UV Map

As this was a quick experiment I used an image from google without making it into a softened brush (falloff). (Left: texture, Right: displacement map).


Using the Flipped Normals tutorial below, I learned how to make displacement maps in ZBrush and use them with Arnold.


And here are the renders.


Next post: XGEN Fur